
What would you say if I told you that you could build the best garden bed you’ve ever had with waste material gathered from your own yard that requires no fertilizer or regular watering? Sounds pretty good, right? Almost too good!
So – what is this magic solution? Hugelkultur gardening.
Hugelkultur is a method of growing vegetation that has been around for centuries. It was developed in Germany as a way to use stumps after land was cleared for farming. The word itself is translated to “hill culture” or “hill mound” (it’s sometimes referred to as “hill” or “mound” gardening).
Essentially, any yard byproducts normally discarded of, including sticks, tree limbs, rotting wood, leaves, grass clippings, dead plant material, compost, etc., can be incorporated into a hugelkultur mound. It is a practical, effective, and resilient technique to utilize biomass “waste” that collects naturally in your yard or property.
Organic plant matter in your yard should not be seen as “waste,” destined for burning or shoveling into yard bags to be hauled away. Ironically, discarding this “waste” is the actual wasteful action. We should aim to use and reuse all available natural resources to us, even if just to build healthier soil.
In line with permaculture principles, hugelkultur gardening replicates a natural process that already happens in nature and helps keep a closed loop resource system on your property.
The genius of hugelkultur gardening is of course not borne of our own ingenuity. When a tree falls and gets mounded over with organic material, a rich forest floor environment is created where nutrients get cycled back in to help vegetative and fungal growth thrive.
The Benefits Of Hugelkultur Gardening
The benefits of a hugelkultur mound are many and have proven to be effective for centuries. They include:
- Moisture retention – the woody detritus (dead matter) soaks up large amounts of rainwater and slowly releases it, which is particularly useful during times of reduced precipitation and drought
- Resilient use of “waste” biomass material for a closed loop system
- Long term fertility building that greatly reduces or eliminates the need for fertilizers or additives, which degrade our precious soil resources
- No till gardening solution (see more below)
- Very low maintenance
- Easy to build and customizable in shape and size to accommodate any space or objective
The best beneift, in terms of permaculture principles, is that hugelkultur gardening is no till, as mentioned above. Many of us have been told or shown that in order to establish a garden you need to till up the existing soil, plant your seeds, and go about the growing and harvesting process. This is actually accepted as a poor practice.
The subterranean environment under our yards is composed of an interconnected and complex web of microbes and other organisms that break down and recycle nutrients to keep soil productive. When we till up our land, we are disrupting these communities and actually compromising the health of the soil. A better option is to keep the underground dynamics in place and instead enrich it by laying organic matter on top.
What Is Needed For A Hugelkultur Mound
Building a hugelkultur mound is actually pretty easy! You can certainly make it more difficult if you want to utilize these techniques in a raised bed with defined edges, but that’s completely up to you. An undefined mound works just as well, and requires less resources.
1. Decomposing Wood
Hugelkultur mounds start with wood – decomposing wood, more specifically. This is an important distinction to make and remember as green (or recently living wood) will actually steal nitrogen from the soil. This severely impacts the growth and health of anything planted in the mound.
The most important goal of a hugelkultur mound is to create a rich, airy, water-retentive growing medium from organic matter that decomposes over time. Wood is the biggest contributor to this nutrient-rich composition.
Whether it be rotting logs, branches, or stumps, wood is both the main structure and fuel of hugelkultur. As wood decomposes, if forms air pockets which provide oxygen to roots and prevent compaction. Additionally, it acts as a sponge that absorbs moisture and releases it slowly. This helps give consistent water supply to plants on your mound, even during droughts. Lastly, and most importantly, the decomposing wood leaches nutrients that will be taken up by your plants for years, if not decades, to come.
2. Other Organic Matter
Although wood is the backbone of hugelkultur gardening, it’s not the only component. Non-woody debris is necessary to provide extra bulk to the mound and to round out its nutrient-profile. Besides logs, stumps, and branches, other organic components you should add are: grass clippings, plant trimmings, leaves from both deciduous (preferably chipped so that they break down faster) and evergreen tree (needles), straw, compost, topsoil, and other non-treated organic material from your yard.
These can all be layered to make a highly nourishing structure for plant growth and prosperity. With that being said, there are a few notable exceptions that you should be aware of and they are known as allelopathic plants. Plants within this classification produce chemicals that can inhibit or promote growth of other plants. Black walnut trees in particular are well known for this and can produce troubles for your mound. Stay away from known allelopathic plants. For more information, check out this awesome article.
How To Build A Hugelkultur Mound
The structure of a hugelkultur mound is such that the larger dead logs, stumps, and limbs should form the base. This base will take longer to break down and will act as the “spongy” foundation for the structure. Think of it as a nutrient provider in the long term, as it will not provide nutrients for plants right away.
The base can either be dug into the ground or sit flat on top of it. For those that are building a hugelkultur mound on grassy lawn, you can dig out the sod that encompasses the footprint of the mound. Then, put the base logs and stumps into the shallow trench that is formed. If you decided to dig the sod, turn it upside down and place ontop of the logs to reuse it as a coponent of the mound itself, creating a maximum closed loop structure.
If working on a slope or uneven surface, digging the base of the hugelkultur mound into the earth can allow for an even footing and stability. Additionally, although not personally confirmed, a partially or fully buried base of wood may speed up the breakdown/decomposition process as submerged wood will most likely be exposed to more microbes and moisture. It’s certainly something to experiment with!
If you are working on ground that is relatively flat, having the base of the mound on top of the ground is perfectly fine. On top of the base, there should be smaller branches and sticks. On top of that you can put your chipped dead leaves and grass clippings. These leaves and grass clippings decompose faster and will therefore provide nutrients for the plant roots that penetrate several inches down.
After that, put a layer of compost a few inches thick. Finally, to top off the mound, apply 1-2 inches of topsoil. See below for progressive pictures of how to put together a hugelkultur mound.
1. The decomposing woody base

2. Sticks, leaves, and other natural non-woody components

3. Grass clippings or another nitrogen-heavy substance

4. Woodchips and topsoil

What To Grow In A Hugelkultur Mound
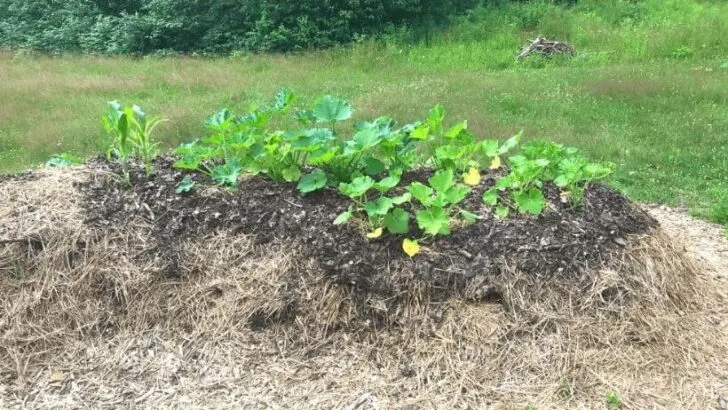
I planted my pumpkin, watermelon, squash, zucchini, beans, corn, and cucumber seeds into the mound. They all germinated quickly and have thrived in the thin layer of topsoil with only the organic matter beneath.
Let’s recognize that a hugelkultur mound is much like any other garden bed in that it is preferable to let it sit for awhile before you start to plant in it. By letting it sit for a few months or even a year, you’re allowing the components to settle while also allowing some decomposition to occur. This will add strength to the structure, release nutrients, and give time for microorganisms to colonize and get to work.
To start planting right away, use decomposing wood to construct the mound. If going this route, we suggest waiting a minimum of one week after building the mound to start planting. Hugelkultur mounds heat up fast – usually faster than a regular gardening bed. Therefore, mounds located in full sun will get considerably warmer. This is great for heat-loving plants, however cool weather crops will probably get stressed and are not recommended unless at least partially shaded.
It is commonly stated that shallow rooted and vining plants such as squashes, melons, and pumpkins do best in this kind of set-up. We’ve had great success with these kind of annuals.
Avoid tuberous, bulb, or root vegetables for the first few seasons. Until your mound has started to seriously break down, these plants won’t have enough room to fully develop under the topsoil.
Observations Of A Hugelkultur Mound
We built our first hugelkulture mound a couple years ago in early spring. We made it with a mixture of partially decomposed soft and hardwood logs topped with (in order from bottom to top) leaves, woodchips, leaves, and topsoil. All of these components were at our disposal on our property.
We would’ve liked to add a layer of compost just under the topsoil, but at that point, we didn’t have any properly seasoned. Throughout the summer, it maintained its structure and stability well, and none of its components got displaced from run off or collapse.
This probably had nothing to do with our “skills” constructing the mound, but rather everything working together by being woven and shaped into the desired structure, like a bird’s nest. All one truly has to do is use a desirable combination of components to get a favorable result.
We decided to put our hugelkultur mound to the test by only putting about 1.5-2 inches of soil on top. It was just enough to bury our seeds – we then relied on everything else to work together as it should.
One of the first things we noticed was that the soil was drying out really quickly. One factor to this was that the spring we built the mound was unseasonably warm and dry, with temperature up to 30 degrees above normal. Additionally, the first two weeks of our mound saw absolutely no rain.
Because of this, in the beginning, we found ourselves having to water the hugelkultur mound frequently at both morning and night to keep it from becoming bone dry. Our mound was positioned in a spot that received full sun all day. This, in addition to hot spring temperatures and high winds, caused the mound to dry out quickly in the beginning.
We decided to add a layer of straw to the top of the mound, along with wood chips to cover up the sides, which helped it better retain moisture. It certainly began needing less manual watering after this remediation.
Unanticipated Consequences of Hugelkultur Gardening
During your first season using hugelkultur mounds, you will certainly come across some unexpected consequences. Depending on your environment, climate, etc., they may be different than what we experienced.
Hard To Tell How Moist It Is
The biggest shortcoming of using mounds as a beginner is that you don’t know what’s going on inside it. Since you don’t want to disturb the mound with seeds and/or seedlings planted in it, there’s simply no way to view what is actually going on inside the mound.
So, although the top layer of soil may be dry, that’s not necessarily indicative of how moist or dry the inside of the mound is. We found ourselves not knowing whether we underwatered, watered enough, or overwatered our hugelkultur mound.
Critters and Pests
One completely unexpected consquence was that the mound attracted many birds. This appears to be due to its vantage point, warmth, and plethora of bugs available to catch. After the seedlings became larger plants, we had a couple casualties, but it’s unsure if they were caused by birds or deer.
Slugs were certainly the biggest problem-causer on our mound. We had a lot in our yard to begin with, but they seemed particularly attracted to the mound. This is most likely due to the mound’s constant moisture and internal spaces to hide in during the day.
We killed hundreds (maybe even over 1000!) of slugs found on the mound throughout the spring and early summer. If we could go back, we would’ve put a layer of fine wood chips further around the mound to allow a larger buffer to stem their advance. We also would’ve covered up the sides of the mound with wood chips earlier on, which may have prevented them from colonizing the interior spaces from the onset.
Because of the construction of our mound, with such a thin layer of topsoil, some sticks protruded out of the mound and created large air pockets underneath them. These empty spaces are problematic in two ways. 1. It allows critters easy access to the inside. 2. Plants may be stunted or otherwise affected if their growing roots hit a gap where they are unable to reach nutrients. Next time we build a mound, we will break up the sticks more so they don’t prop-up certain areas and cause inside spaces.
There you have it. A breakdown of hugelkultur gardening by real people who have actually tried it! We wish you the best of success with yours. Go forth and may your gardens be ever prosperous!
Hope
Saturday 25th of February 2023
Hi... Have you had any issues with rodents (those of the mouse/mole form and the cute squirrel and bunny varieties) accessing the mounds..? We've had raised beds in the past and they are in need of replacing due to age/rot. We have always had problems with the burrowing rodents as well as the bunnies and squirrels snacking away.
We are intrigued by the Hugelkultur Mound system and are planning on laying the foundation for a few beds this weekend.